How to Fine-Tune a Causal Language Model with Hugging Face
Causal language models, such as the renowned GPT series, are a subset of Large Language Models (LLMs) and have become increasingly popular in the field of natural language processing (NLP). Alongside the rise of these models in popularity, so too has arisen Hugging Face as a widely-adopted open-source library that provides an amazingly powerful set of tools that make creating and training LLMs relatively straightforward for experienced software engineers.
My name is Bobby Gill, I am the co-founder and Chief Architect at BlueLabel, where I currently lead our AI consultancy group. In this blog post, I will dive into the process of fine-tuning a causal language model using the Hugging Face library and its Trainer API. Specifically, I will look to see how I can take an open source language model available on Hugging Face, in this case DistilGPT2, and fine-tune it to emulate the speech patterns of Spock, the half-human, half-Vulcan scientist from the Star Trek show who renowned for his intelligence and commitment to logic and reason.
All the source code I’ve used to train the model in this article is available for you to use and modify in this GitHub gist. You can find the fine-tuned model trained in this article on Hugging Face.
What are Causal Language Models?
A causal language model (causal, not casual!), also known as an ‘auto-regressive’ model, is a type of Transformer model trained to predict the next word (or token) in a sequence based on previous words (hence the ‘causal’), allowing them to generate coherent and contextually relevant text. The power of causal language models and their ability to capture language patterns and generate human-like text has made them valuable tools for various NLP tasks and are what underpin popular LLMs like ChatGPT and Claude.
What is Fine-Tuning and When is it Needed?
Every language model needs to be ‘trained,’ meaning it must be fed an enormous amount of data to learn by detecting patterns and relationships in that data. Thus, a language model can only reason using data it was trained on, or context that has been provided or retained during a conversation. The latter approach is the basis for Retrieval Augmented Generation, which I have previously explored here. However, an alternative to RAG is through the process of ‘fine-tuning’ which serves to further train a pre-trained model on a smaller, task-specific or domain specific data set. For example, if you asked ChatGPT to answer questions using your company’s SharePoint catalogue, or Exchange database, it would have no idea how to do it. Through the process of ‘fine-tuning’, you can teach the LLM new patterns, nuances and vocabulary that exist in datasets it has not seen before. With the generative AI work we’ve done at BlueLabel, we’ve found that while the RAG approach does work, however we’ve found that in general you can get better output through a fine-trained model than a general purpose model augmented with RAG.
Steps to Fine-Tuning a Causal Language Model
At a high level, the steps needed to fine-tune a causal language model consist of:
- Prepare and process a dataset for fine tuning.
- Select and load a pre-trained model.
- Tokenize and collate the dataset.
- Set up the Trainer.
- Evaluate the performance of the pre-trained model.
- Run the fine-tuning process.
- Evaluate the performance of the fine-tuned model.
In the next sections I will go through each of these steps and provide the code I used to complete each one.
1. Prepare and Process a Dataset for Fine Tuning
The first step to get our language model to talk like Spock is to find enough examples of Spock’s dialogue that we can use for training. To do this, I adapted an existing Kaggle dataset that contains the screenplays of all of the original Star Trek shows and extracted out all of Spock’s dialogue and outputted into a dataset. Here is what one row of data from the dataset looks like:
{'title': 'Space  Seed ',
'original_airdate': '16 Feb, 1967  ',
'production_number': 24,
'dialogue': 'Illogical.'}
The dataset is loaded and made ready for further processing by this line of code:
dataset = load_dataset('omgbobbyg/spock')
This dataset is available to use on Hugging Face’s dataset hub here.
2. Select and Load a Pre-Trained Model
Once we have the data, we need to select a baseline language model to use as the starting point for our fine-tuning exercise. Given we are training a causal language model designed to generate new pieces of text, we need a baseline model that is a ‘decoder’, that is a model that for a given word the attention layers can only access the words positioned before it in the sentence. There are any number of really good decoder models you can use for our problem such as GPT-2, Mistral or Gemma. For the purposes of this exercise, I’ve decided to go with a DistilGPT2, a distilled version of GPT-2 that is smaller and easier to run on home hardware.
from transformers import AutoTokenizer, GPT2LMHeadModel, AutoConfig, AutoModelForCausalLM

model = AutoModelForCausalLM.from_pretrained(pretrained_model)
At the end of the above code block, I have all of my lines of Spock data loaded into the dataset variable, which is further divided into a ‘training’ and ‘validation’ split with the following structure:
DatasetDict({
    train: Dataset({
        features: ['title', 'original_airdate', 'production_number', 'dialogue'],
        num_rows: 3476
    })
    validation: Dataset({
        features: ['title', 'original_airdate', 'production_number', 'dialogue'],
        num_rows: 869
    })
})
3. Tokenize and Collate the Dataset
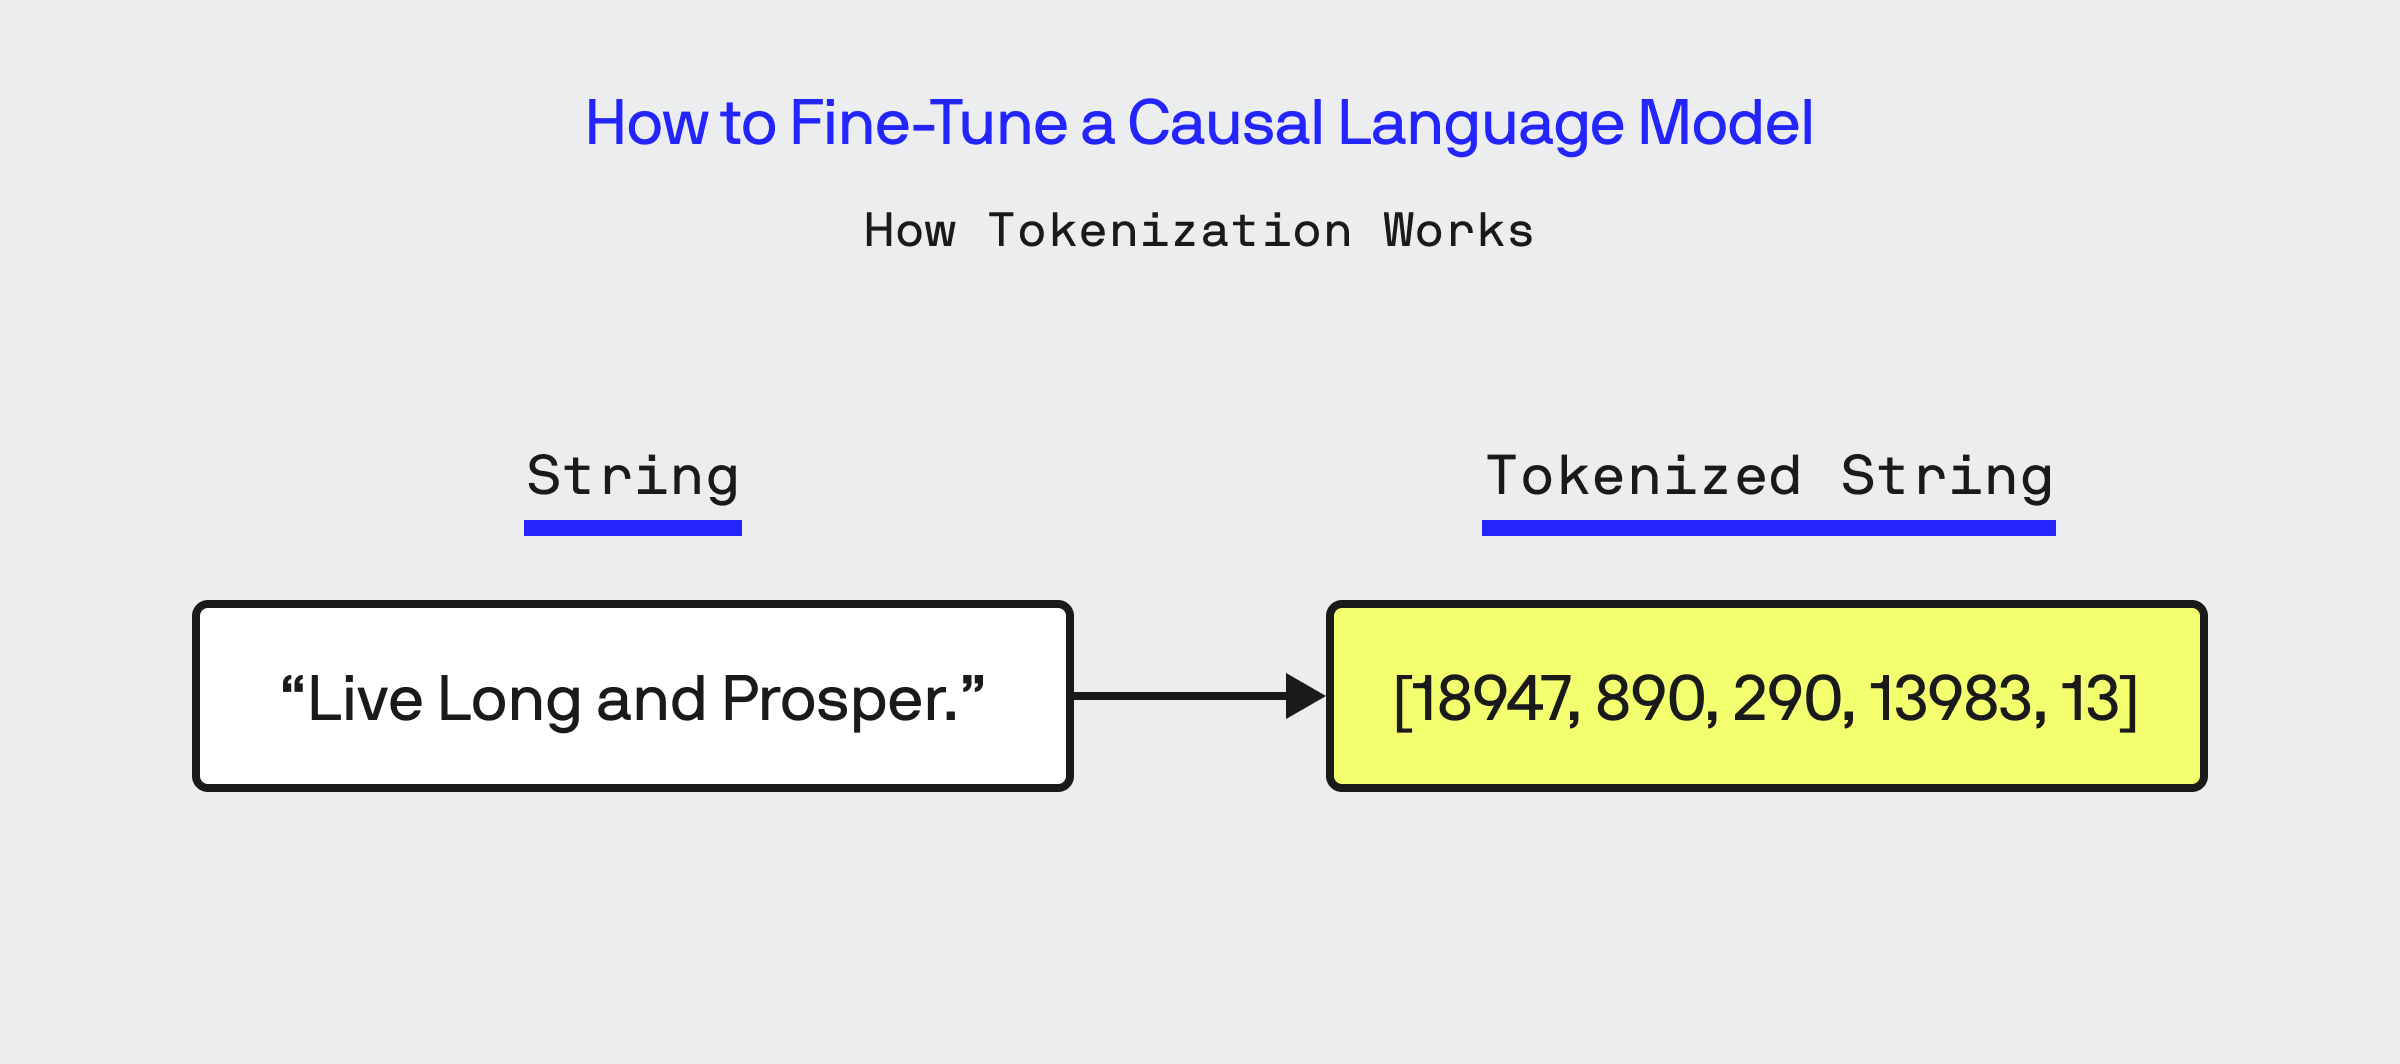
Once the dataset is loaded, the next step in fine-tuning is to ‘tokenize’ all of the data. Tokenizing means converting the words of text into a set of numbers representing it, which is done through the use of the Tokenizer class in Hugging Face. It is essential that when fine-tuning you use the same Tokenizer that was used during the training of the base model, which is easily done by instantiating the tokenizer via the AutoTokenizer class.
from transformers import GPT2Tokenizer
tokenizer = AutoTokenizer.from_pretrained(pretrained_model)

def tokenize_function(examples):
    return tokenizer(examples["dialogue"],max_length=max_length)


# Apply the tokenization function to the entire dataset
tokenized_dataset = dataset.map(
    tokenize_function,
    batched=True,
    batch_size=10,
    remove_columns=dataset["train"].column_names
)
At the end of this code block, I’ve converted my dataset object into a tokenized version of it with the following structure:
DatasetDict({
    train: Dataset({
        features: ['input_ids', 'attention_mask'],
        num_rows: 3476
    })
    validation: Dataset({
        features: ['input_ids', 'attention_mask'],
        num_rows: 869
    })
})
The original column ‘dialogue’ from my dataset is now represented as a sequence of integer tokens within the input_ids list in my dataset.
What about Padding?
One thing to understand about training and fine-tuning, is that much of it is driven off of matrix multiplication done on a GPU, which is most efficient when we are dealing uniform dimensions. When we get to actually training our model, it is essential that each batch of input_ids that are used in a training cycle have a uniform dimension. As you can see above, my input_ids are not of uniform length. To solve this problem, I could choose to pad my entire tokenized dataset uniformly, that is use the length of the longest line of tokenized dialogue and set the length of every other line’s input_ids list to that length. I’ve told the tokenizer not to do this, as I will rely on the Hugging Face data collator to dynamically pad the data during the training and not during tokenization.
An additional consideration for tokenization is to ensure that no row of data you are tokenizing exceeds the maximum context size for the base model. In my case, the maximum context size is 1024 tokens which is far longer than any one spoken line of Spock’s dialogue, so it is not something I need to handle at the moment.
Data Collation
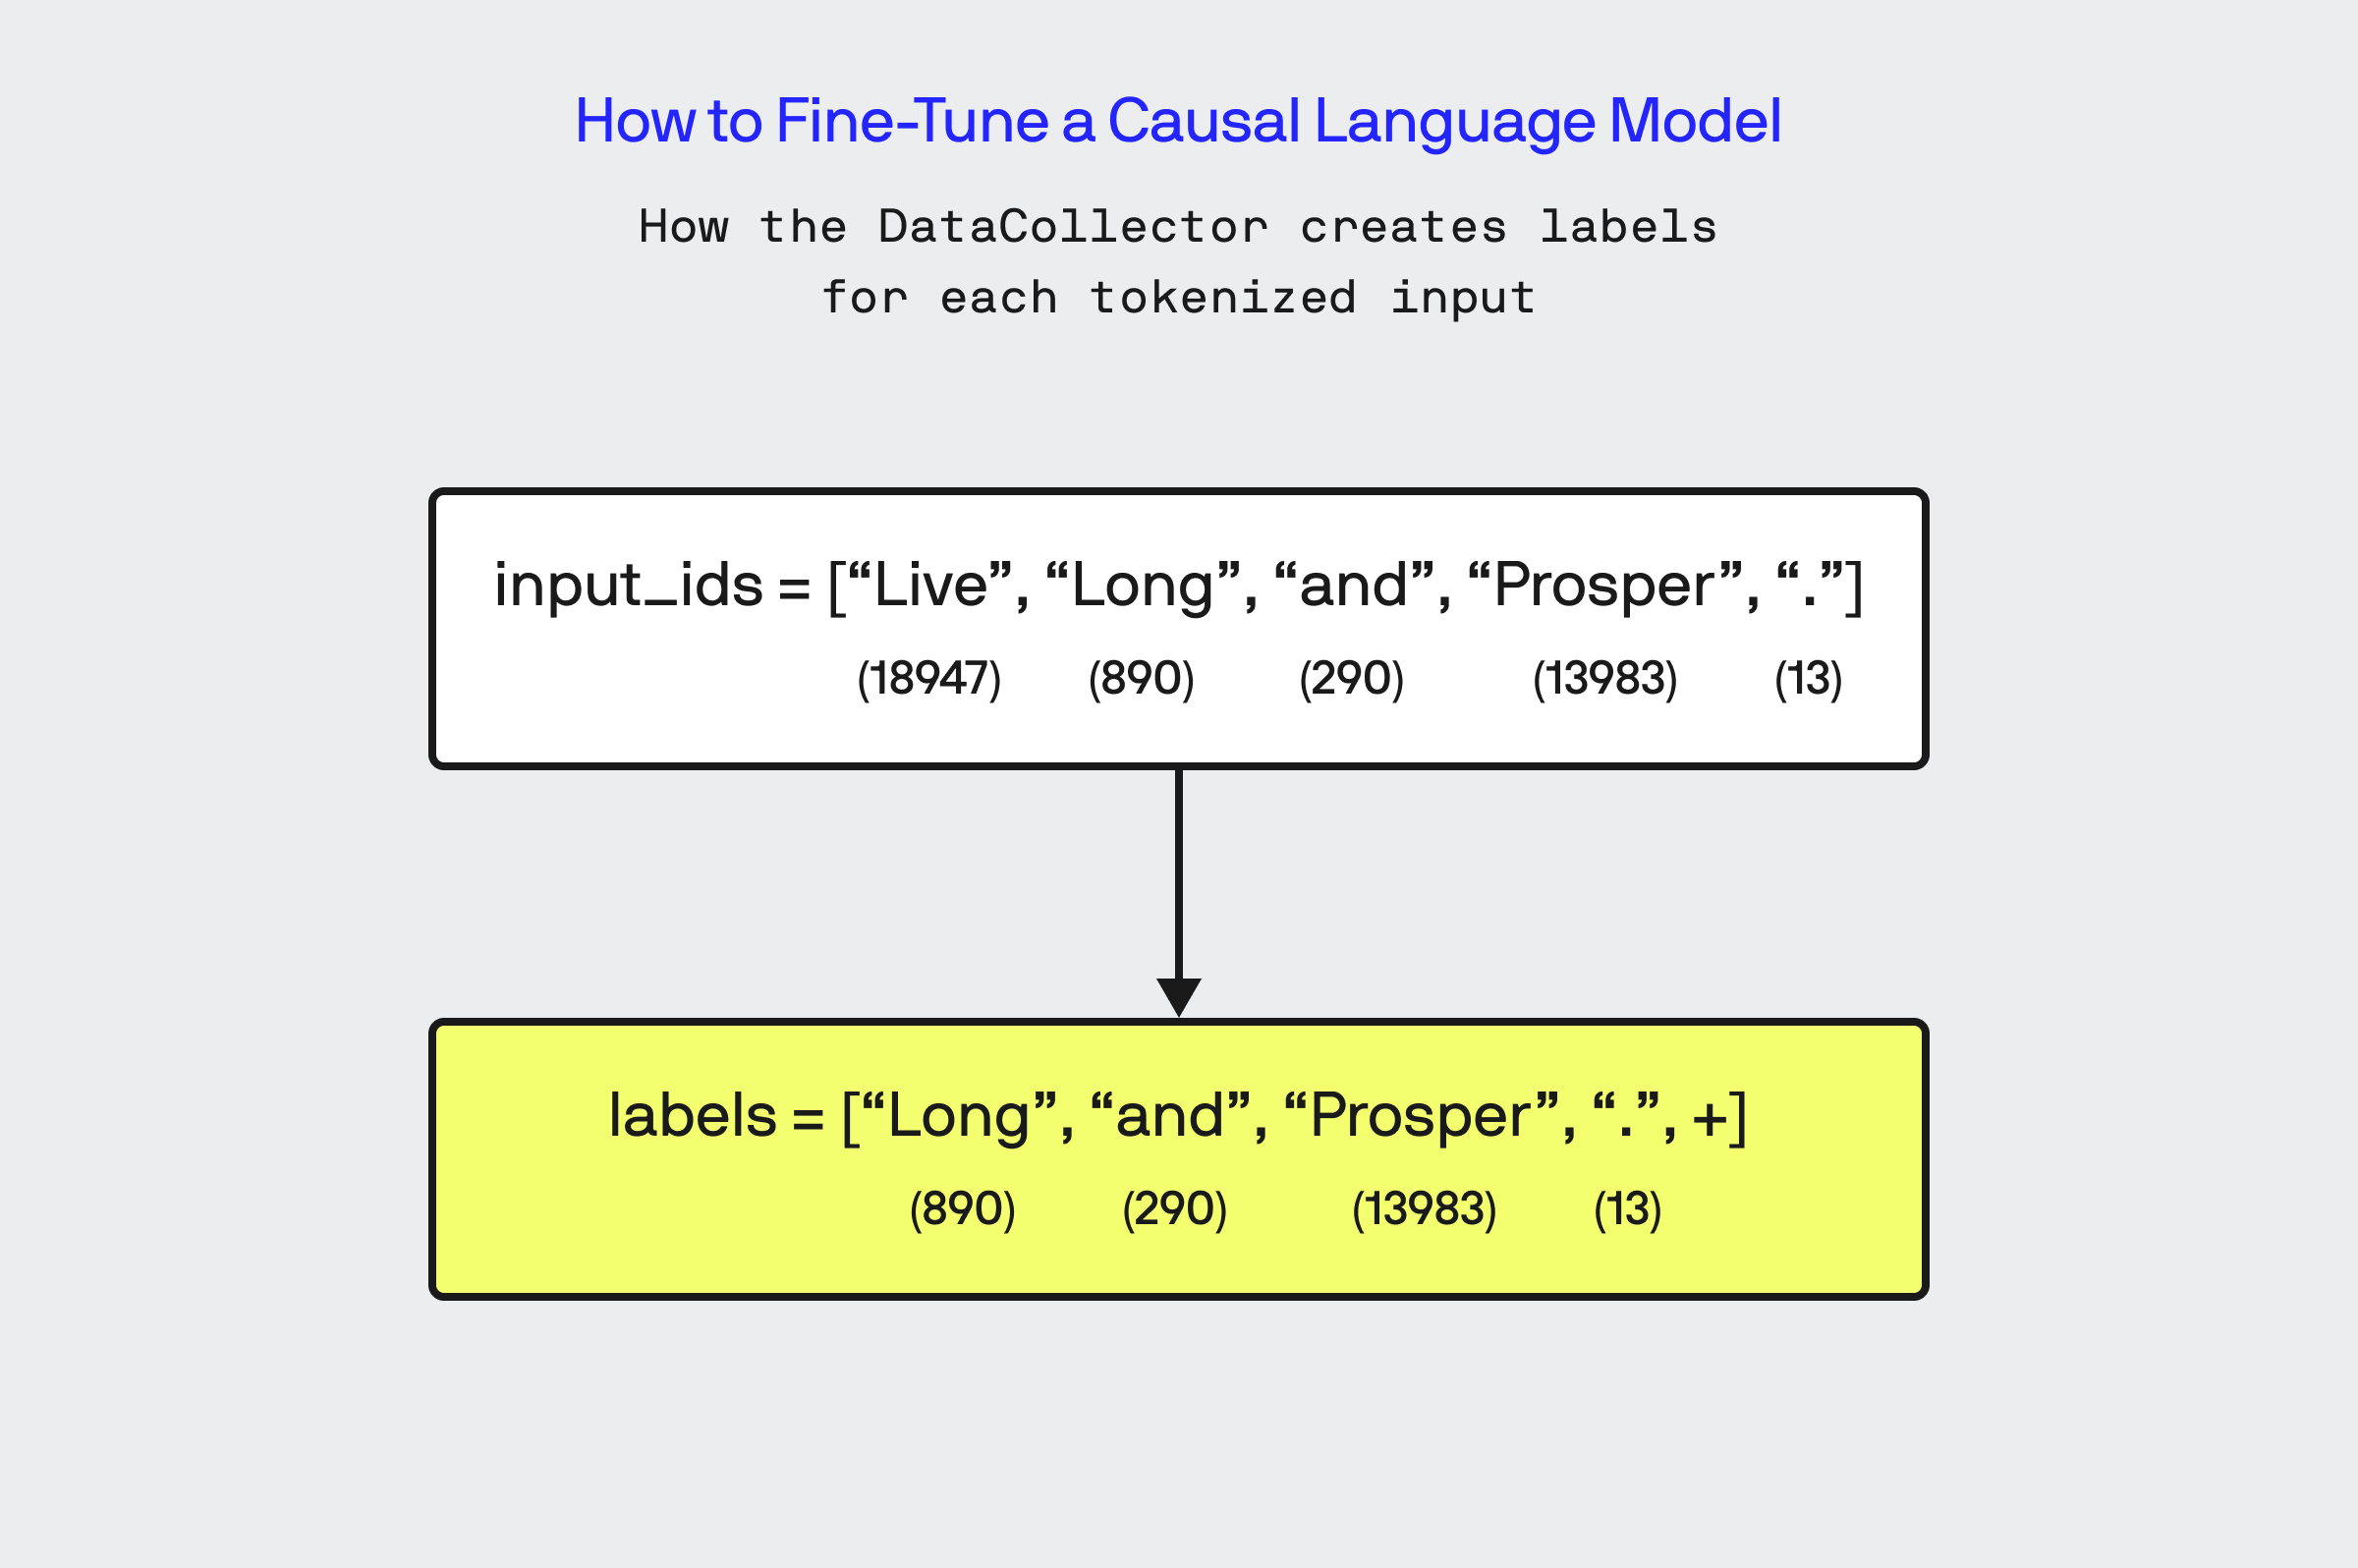
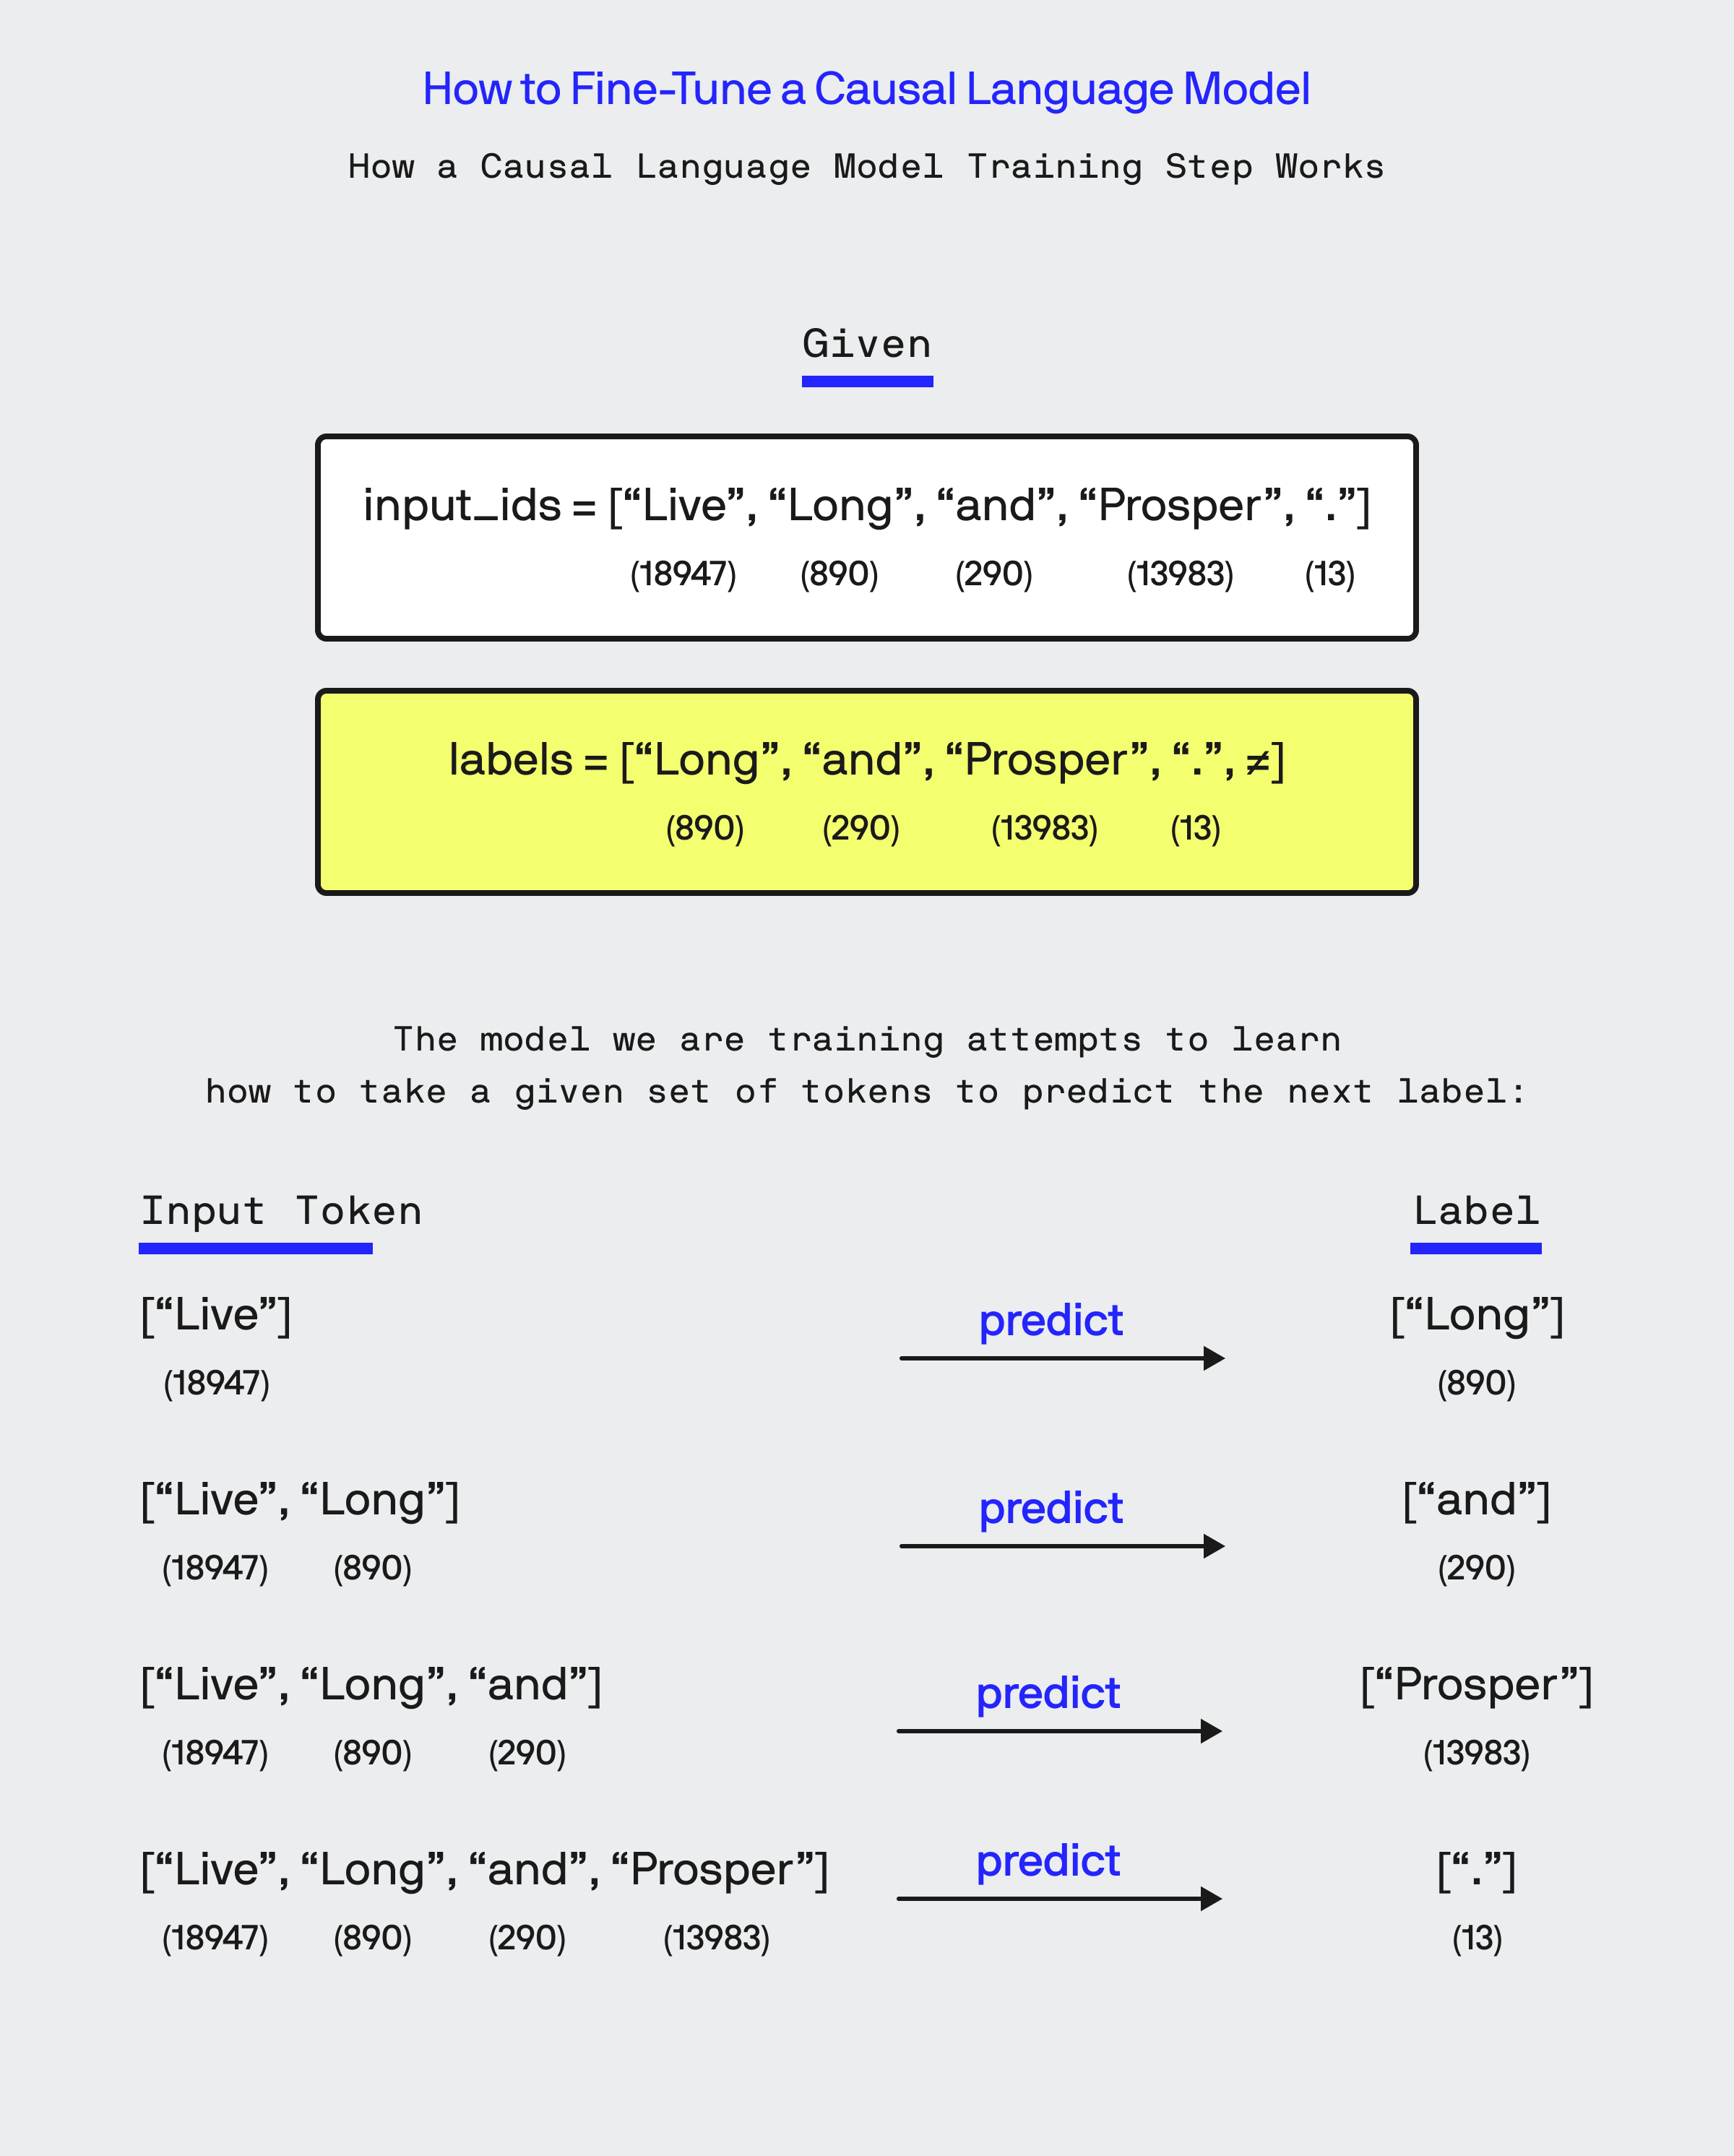
Once the data is tokenized, I setup the Hugging Face DataCollator object which is responsible for feeding data to the model during the training. The DataCollator responsible for creating batches of input sequences and their corresponding target labels along with padding each input sequence to the length of the longest sequence in the batch. Since we are training off of an unlabeled dataset, the Data Collator creates labels automatically by taking the input_ids and shifting to the right by one position, so that at each index of the input_id array the corresponding index in the newly generated labels list contains the correct next word in the sequence.
The DataCollator outputs the input IDs batch, label IDs batch, and attention masks, which are then used for training the causal language model. The model takes the input IDs and attention masks as input and learns to predict the corresponding label IDs.
4. Setup the Trainer
Next, I create the Trainer and TrainingArguments objects which will actually perform the training:
from transformers import Trainer, TrainingArguments

args = TrainingArguments(
    finetuned_modelname,
    evaluation_strategy="epoch",
    save_strategy="epoch",
    learning_rate=2e-5,
    num_train_epochs=3,
    weight_decay=0.01,
    fp16=is_gpu_available,
    push_to_hub=True,
    per_device_train_batch_size=4,
    per_device_eval_batch_size=4,
    hub_model_id=huggingface_reponame
)

trainer = Trainer(
    model=model,
    tokenizer=tokenizer,
    args=args,
    data_collator=data_collator,
    train_dataset=tokenized_dataset["train"],
    eval_dataset=tokenized_dataset["validation"]
)
When creating the Trainer object, this is where you put together all of the objects we’ve setup so far: the pre-trained model, the tokenizer, the data collator, training arguments and finally the tokenized training and validation datasets.
Now you might think the next step is to kick the tires and light the training fires, but no, we have one thing to do before we start our fine-tuning: evaluate how well the pre-trained model performs on our dataset!
5. Evaluate the Performance of the Pre-Trained Model
To understand how well our fine-tuned model performs, we need to first measure how effective the baseline distilgpt2 model performs in speaking like Spock:
#lets now run against the base model and log the results
initial_results = trainer.evaluate()
print(initial_results)
#log the results to file
logger.info(f"Baseline {pretrained_model} Results: Perplexity: {math.exp(initial_results['eval_loss']):.2f}")
print(f"Baseline {pretrained_model} Results: Perplexity: {math.exp(initial_results['eval_loss']):.2f}")
In the above code block, we use the Trainer object’s evaluate() method, which uses a subset of validation data from our dataset to measure the model’s ability to predict the next sequence of tokens in each line of dialogue. The metric it outputs that is most useful for us to use when evaluating the model’s performance is perplexity.
What is Perplexity?
Perplexity is a commonly used metric to evaluate the performance of a language model, including causal language models. It measures how well the model predicts the next token in a sequence based on the previous tokens. Perplexity is calculated by taking the exponential of the average negative log-likelihood of the model’s predictions. A lower perplexity indicates that the model is better at predicting the next token, suggesting that it has learned the patterns and dependencies in the language more effectively. For example, if a causal language model trained on a specific domain achieves a lower perplexity compared to a generic model, it indicates that the fine-tuned model has successfully adapted to the domain-specific language patterns.
Running the base pre-trained model on my Spock dataset yields a perplexity value of ~253. This means that, on average, the model considers 253 tokens to be equally likely as the next token at each step, given the context of the previous tokens. That is a pretty high number and tells us the model has a lot of uncertainty or difficulty when trying to predict the next token in any of Spock’s lines.
6. Fine-Tune the Model
Finally, after all that, we are ready to initiate the fine-tuning of our model! The whole process is kicked off with a single line of code:
trainer.train()
During training, the model processes the input sequences, generates predictions, and compares them with the target sequences (called labels) to compute the loss. The model’s parameters are then updated based on the gradients of the loss, allowing it to improve its predictions over time. This process is repeated numerous times, across 3 different independent runs (called ‘epochs’, which were specified when I setup the TrainingArgs object).
Below is a visual representation of how training of a causal language model actually works. Given that our training data is just a corpus of spoken lines by Spock, our Data Collator has created a labelled set that is just the input tokens shifted to the right. With that, the training is done at an index by index basis on the input token sequence, where at each index i of input token sequence the model attempts to find the right parameters that allow it to use tokens of the input sequence from 0 to i to predict the token value at the i-th index of the label sequence:
Given the small size of our model and data set, the training should only take a 5-10 minutes to complete on a GPU. (I am running my training on a Threadripper 1950x, under Windows Subsystem for Linux with a NVIDIA 1080ti GPU).
7. Evaluate the Performance of the Pre-Trained Model
With the training complete, I run the same evaluate() method on the fine-tuned model:
#evaluate the fine tuned model
eval_results = trainer.evaluate()
perplexity = math.exp(eval_results['eval_loss'])
eval_results['perplexity'] = perplexity

logger.info(f"Fine-tuned {finetuned_modelname} Results: Perplexity: {perplexity:.2f}")
print(f"Fine-tuned {finetuned_modelname} Results: Perplexity: {perplexity:.2f}")
Once the evaluation loop is done, the fine-tune model now returns a perplexity score of ~47! While 47 is still not a great number, it is still a lot better than the ~253 that the base model scored.
| Prompt | Base DistilGPT2 | Fine-Tuned Model |
|---|---|---|
| “What is the meaning of life?” | “It’s not a different thing, but there’s an underlying reason why I consider evolution to be a species of complexity. If we allow evolution to arise, how do we reconcile it with some of the facts that exist?” | “What is it, Captain? What is it, sir? I presume we shall return to the Enterprise. We shall find out. Captain, what is the origin of the universe?” |
| “Where did that planet go?” | “You would see, after all, this thing was going to explode a lot of places, and you wouldn’t know what would happen, so that it was going to be all-caps. This was the beginning of a new era, with the rise and rise of virtual reality, and in virtual reality there are things that are coming and going to happen. You know, I just don’t know.” | “There were other planets. Our closest target was asteroid Vos. That planet is ours, and the entire planet is dead? That’s a strange entity, but we’re getting there too. That’s why you will need your orders to find out what, Mister Sulu. He’ll have your instructions to find out what you are doing. He’ll have whatever excuse you may have.” |
| “What’s the best way to cook a turkey?” | “My husband has had many problems with cooking potatoes as long as he didn’t have the energy to cook as a human, so we just decided to make this a recipe. I use some veggies like garlic and zest and try my best to avoid using all the extra flavor to make it more delicious.” | “By using the most primitive methods to achieve that goal could, I suggest I begin a process that, when done correctly, may also be totally successful. As a human being, I cannot do anything to keep your taste buds healthy. However I do have an antidote. I’ve come a long way.” |
Let’s be frank here, the fine-tuned model is still not coherent and speaks in gibberish. But remember, the base model for this fine-tuning is GPT-2, which is primitive by 2024 standards and outputs largely gibberish to begin with. With the fine-tuning, you can clearly see when compared to the base model, that the gibberish it is spewing out is very much in the matter of fact tone Spock and references concepts and themes central to his character in the original show.
How to Improve the Model?
There a number of different approaches I could take to improve how well the model is able to speak like Spock. The first one is to start with a more modern base model for the fine tuning, one that isnt GPT-2. Second, the dataset used for training is quite naive, it’s just lines of dialogue Spock says, without any context in terms of what he is talking about or who he is talking to. Finally, another approach I would like to investigate is exploring how different approaches to tokenization might influence the effectiveness of the model. Nevertheless, regardless of the quality of the results of the base model and fine-tuned model, the basic steps to fine tune a model using the Trainer API of Hugging Face remain the same.
Conclusion
In this post, I’ve provided a broad overview of how to fine-tune causal language models using the Hugging Face library. Starting with the foundational steps—preparing your dataset, selecting the right model, and managing the training process—I hope you feel better equipped to start applying these techniques. But remember, this is just the beginning.
I’m excited to delve deeper in my upcoming posts. I plan to explore the concept of perplexity, which is vital for measuring a model’s understanding of language. I’ll also compare how different base models affect the performance of fine-tuned models. Additionally, I’ll examine how changes in tokenization and collation approaches can impact accuracy.
Stay tuned for these detailed discussions. My goal is to break down these complex topics into digestible insights, helping you not only enhance your models but also refine your approach to natural language processing tasks.
Links
Bobby Gill
