How To Redirect Or Forward HTTPs From One Domain To Another Without Certificate Errors
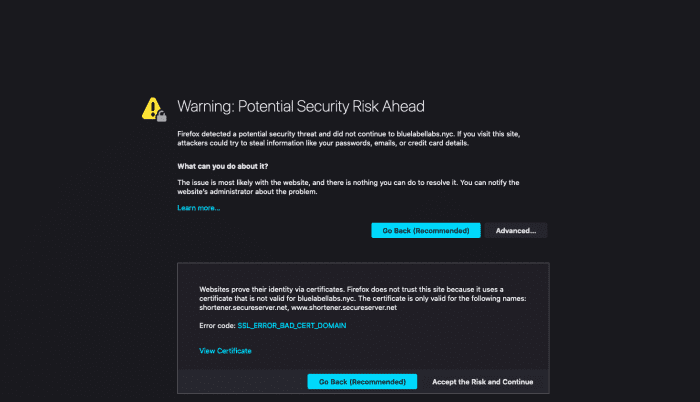
If you have a domain and would like to forward it to another, most domain providers make this rather trivial to do for HTTP calls. For instance, in GoDaddy you can setup Domain Forwarding and it will take care of this for you either by issuing a HTTP redirect or by masking your domain with the domain you want to forward to. However, while this makes redirecting a HTTP call to a relatively simple, where it often falls apart is when you want to redirect HTTPS from ‘domain1.com’ to ‘domain2.com’. If you use GoDaddy’s domain forwarding, attempting to access https://domain1.com in your browser will result in this certificate error:
In this article, I will show you how to solve this issue quickly and without the use of any intermediate servers or any mucking about in .htaccess files, all through the use of Amazon Web Services.
Approach
At a high level, we will redirect both HTTP and HTTPs for domain1.com to domain2.com by leveraging a AWS’s Application Load Balancer (ALB) , a certificate provisioned by AWS and a redirect rule setup on the Application Load Balancer.
Pros to this approach:
- You don’t need to pay for a SSL certificate for domain1.com
- You do not need to spin up a server and and use a .htaccess file at the Apache or NGINX level to perform the redirect.
- You avoid any SEO issues by implementing a permanent HTTP redirect of domain1.com to domain2.com
Cons to this approach:
- While you save the cost of the certificate, you will pay for the cost of the ALB, which is at least $15 /month. Note, if you already have a ALB setup for a different purpose you can re-purpose that existing ALB to implement this solution!
Pre-requisites:
Throughout this example I will refer to domain1.com as the domain we are looking to redirect and domain2.com as the target of that redirection.
1.) An AWS account.
2.) Access to the DNS settings for domain1.com.
Steps to Setting Up a HTTPS Redirect From Domain1.com to Domain2.com
1.) Provision a Certificate for Domain1 in AWS Certificate Manager
- Login to your AWS Management Console, and open up the Certificate Manager.
- Provision a public certificate, for the domain name enter “domain1.com”, and optionally, “*.domain1.com” so you can use this certificate for all subdomains as well.
- Choose to use DNS validation, you will be displayed two DNS CNAME values to copy to the DNS of domain1.com. Both of them are the same, so you only really need to add 1 of them. The CNAME record it instructs you to add will look like:
- Name: <random alphanumeric>.domain1.com
- Value: <random alphanumeric>.<random alphanumeric>.acm-validation.aws. (note you need to make sure you add the trailing period to the value!)
- Login to your DNS provider, add the CNAME record from the previous step to your domain1.com DNS entries.
- Return to the Certificate Manager console, click the refresh button. After a minute or two, you should see the certificate status change to “Issued”. Do not proceed to the next step until you see “Issued”.
2.) Create Application Load Balancer in AWS EC2 Console
- Login to the EC2 management console, under Load Balancers, click “Create Load Balancer”.
- Choose “Application Load Balancer”.
- Give your load balancer a name, leave most of the values as their default, however under Listeners, click “Add Listener”.
- Choose “HTTPS (Secure HTTP)” in the subsequent dropdown.
- Choose at least 2 subnets for the load balancer to be active in, the values for these really don’t matter, so just select the first two options.
- On the next page “Configure Security Settings”, make sure “Choose a certificate from ACM” is selected under “Certificate Type”.
- In the drop down box below it, now select the certificate you provisioned in the previous section.
- Proceed through the rest of the Load Balancer setup wizard. You can accept most default values, we really aren’t using the load balancer so it doesn’t matter how the rest is configured.
- Once your load balancer is created, on the resulting screen note down the DNS name of the load balancer, it will end with “elb.amazonaws.com”.
3.) Add Redirect Rule to the HTTPs Listener on Load Balancer to Redirect Domain1.com to Domain2.com
- In the Load Balancers list in the AWS console, select the load balancer we just created, switch to the Listeners tab and then under rules click “View/Edit Rules”.
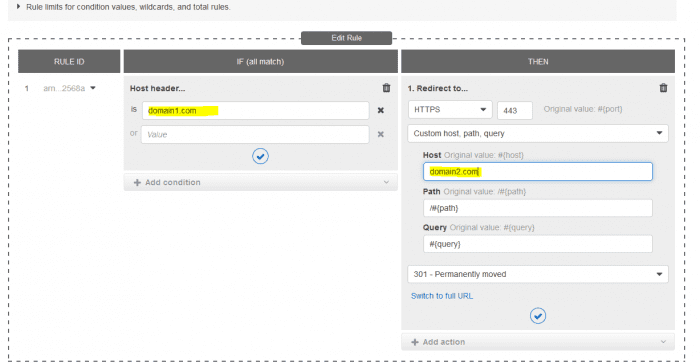
- In this next screen, we are going to add a very simple redirect rule which will redirect HTTPS calls to domain1.com to domain2.com.
- Under “Host Header is”, add “domain1.com”
- Under “Redirect to”, change the Host value to “domain2.com”.
4.) Add DNS Entry to Point Domain1 to Application Load Balancer
- Taking note of the DNS name of the load balancer we created above, login to your DNS host and add a new CNAME record:
- Host: @
- Value: <DNS Name of Load Balancer>
That’s it! You have now redirected your original domain for both HTTP and HTTPS to a new domain and avoided any certificate errors being shown in the browser.
Bobby Gill


